


Sometimes you’re looking for a quick turnaround and luckily, Showit made it possible. While a custom-built website sounds great, you don’t always have the time for a 6-12 week process (or maybe it’s simply not in your budget). With Showit – and the use of Showit website templates – you’re able to create your website in a week!
The Showit platform caters to small business owners and creative entrepreneurs looking to establish their online presence. They’ve become the best place for businesses to create a new site, particularly when they’re working on a tight timeline.
With their user-friendly platform, you don’t need to be a web designer to get started. You’ll need to spend some time familiarizing yourself with the platform – as with all online tools – but, you’ll be able to customize your site to match your brand with ease. Here’s how you can build your website in a week –
Step #1: Clarify Your Offers & Audience
Step #1, or Day 1, is going to be spent clarifying your offers and audience. What is your offer? For example, are you a social media marketer, a virtual assistant, blogger? Or maybe you are a coach or consultant – or you’re in a field with a niched service, like a doula or sleep consultant.
While you should always be familiar with the essentials of your business, this is a necessary step to help you decide the direction of your website. Potential clients are going to be visiting your website and you want to ensure that they know what they’re looking at – and what you’re offering.
The goal is not to establish a simple website, but to create a high-converting website where you’ll see a higher level of conversions in comparison to a standard website. This stems from designing a website that is specific for your offers or your audience, but since you’re working on a timeline, you’ll want to choose the best-suited alternative. A website template.
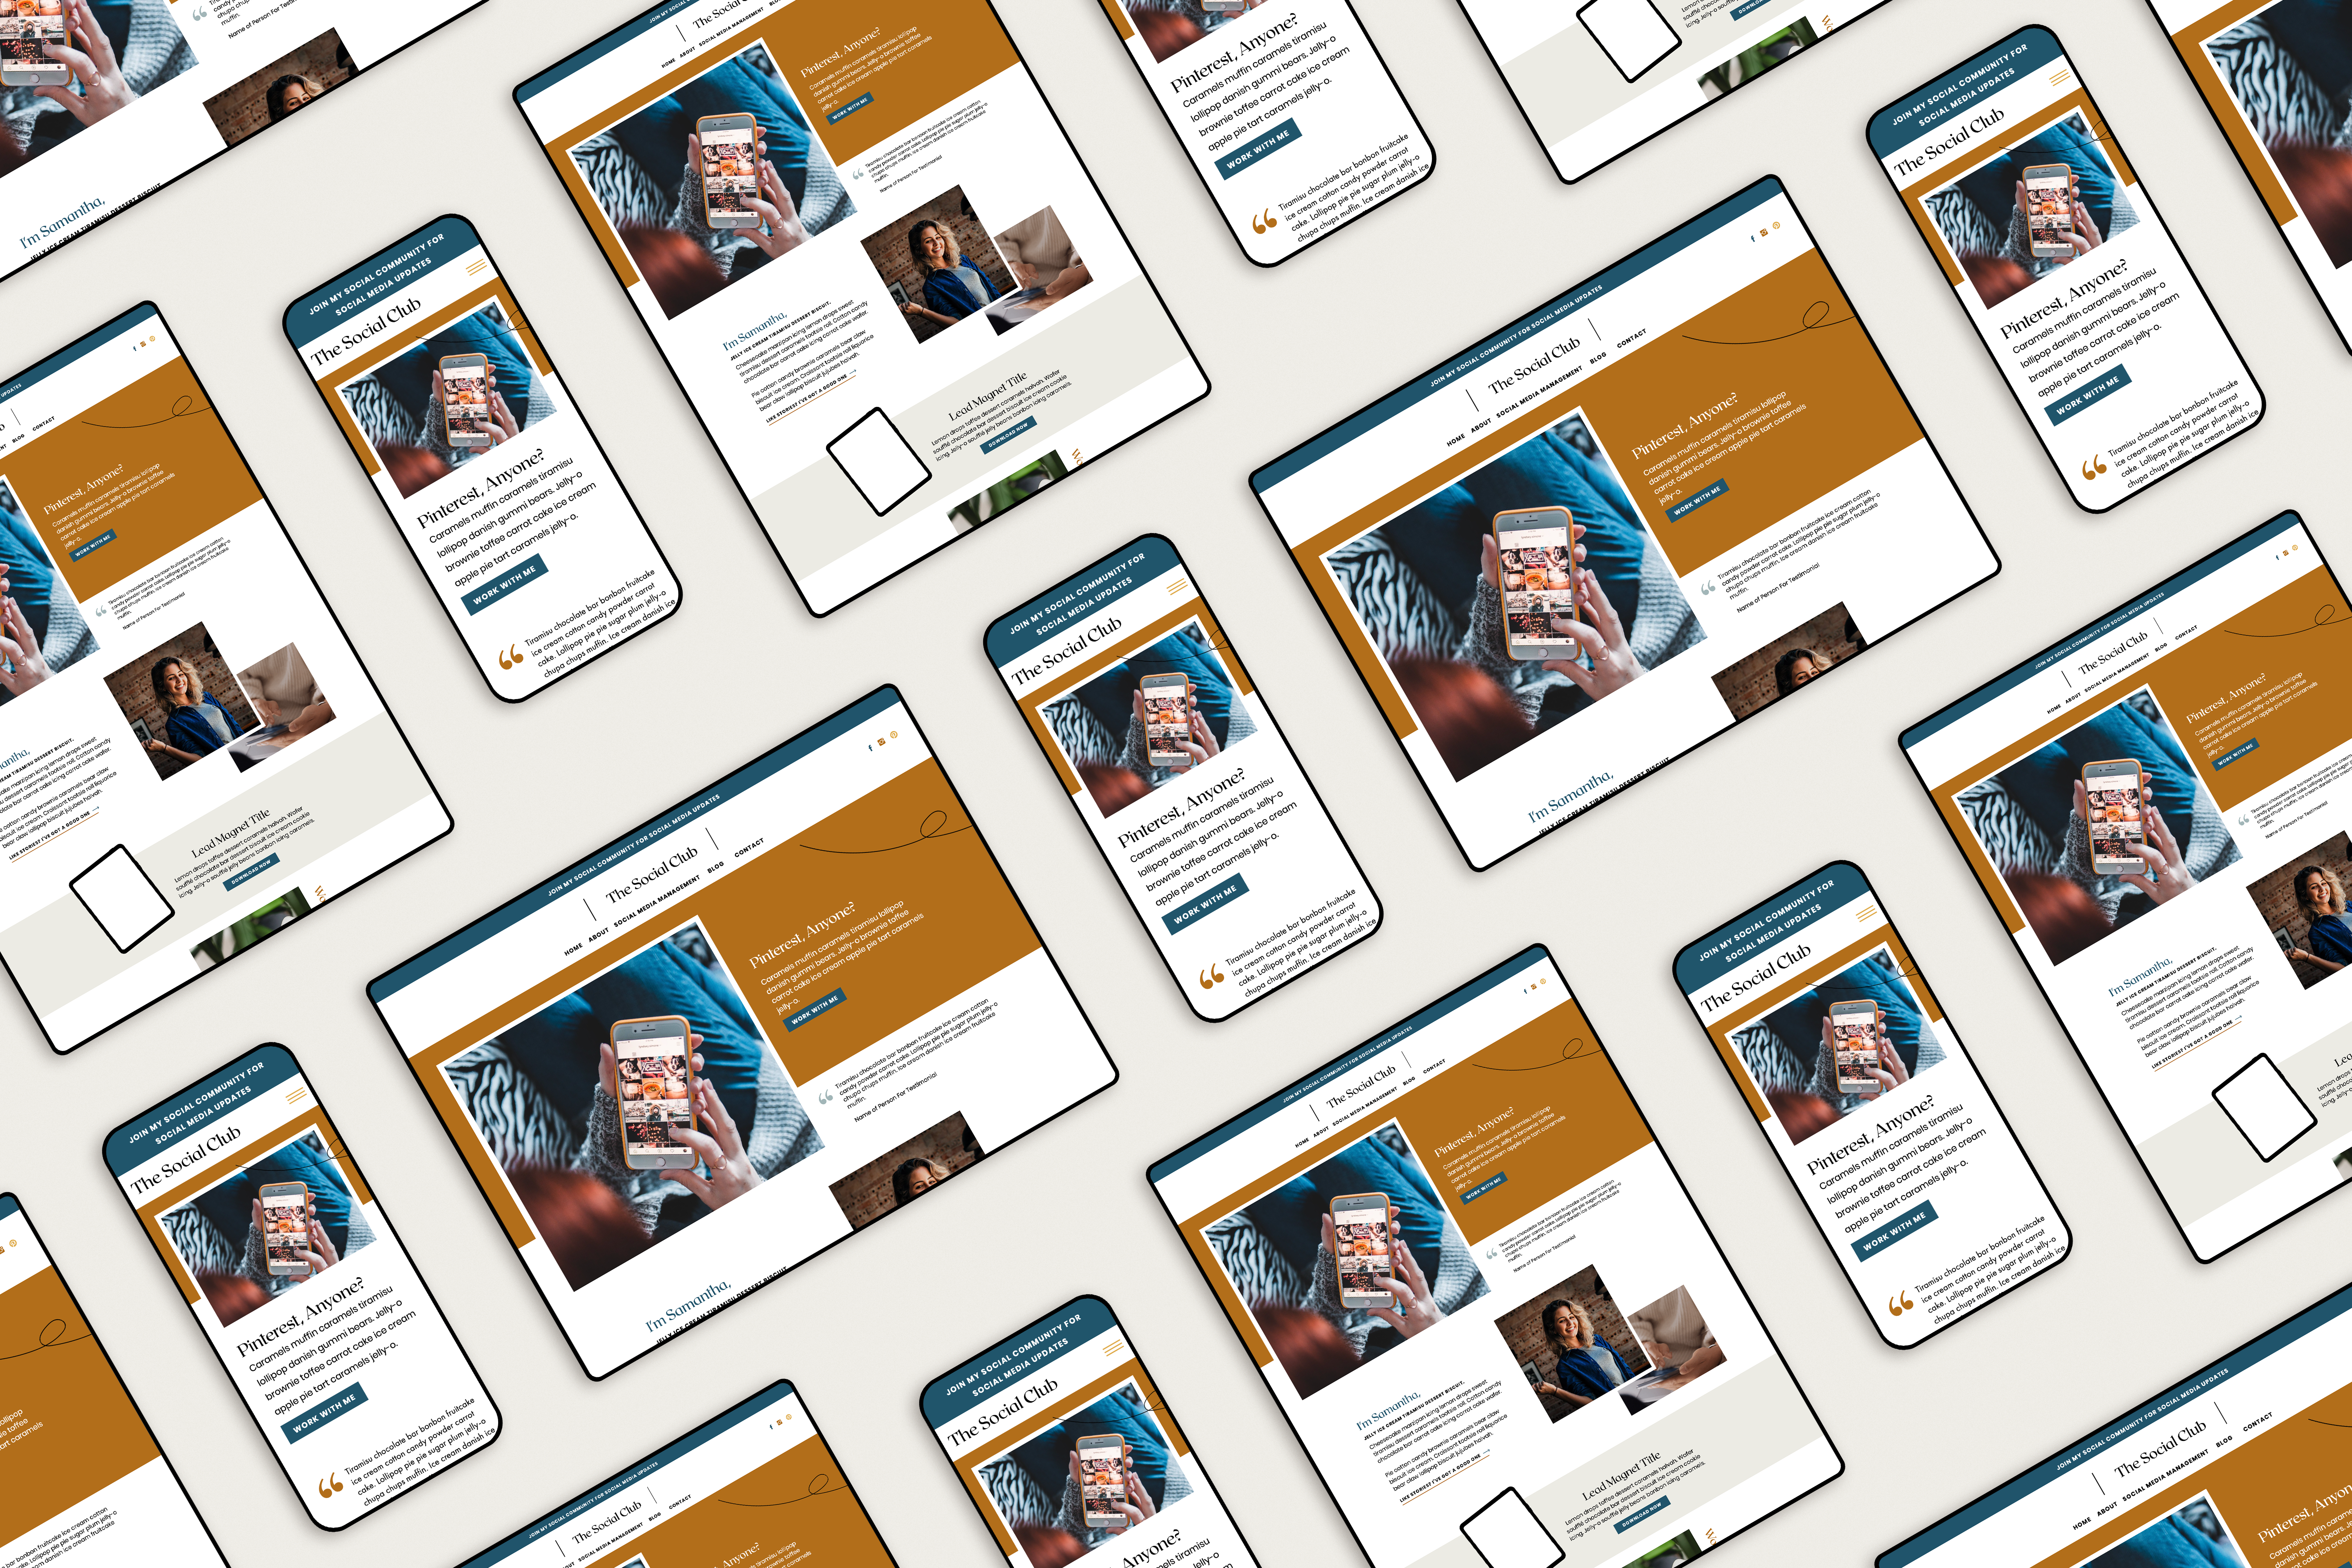
Step #2: Choose a Template Designed for Your Business
Step #2, or Day 2, is when you’re going to choose your website template. There are thousands of Showit templates available – but you’ll want to choose one that not only aligns with your brand but your offers and audience. Showit templates can be found on some Showit web designers’ websites or in third-party marketplaces like Creative Market and Etsy.
Unlike most designers and template shops, Âme Creatives offers a template shop with Showit templates specifically for your business. Our designs are based on working with multiple clients in the industry to establish what you’ll need to successfully attract and connect with clients. As of right now, we offer one templates:
- The Dreamer for Sleep Consultants & Doulas
When you build a Showit website in a week, choosing the right template to work from can either save you time – or cause you to spend more time editing and adjusting until it’s quite right. This is why I suggest taking a day to comb through your options and choose one that is best for you and your business.
Can I Use a Free Website Template?
Once you sign up for Showit, you’ll notice that they have a free library of templates to start from. While these templates are great and are designed by certified Showit partners, there are a few cons when picking a free template.
You’ll find that working from a free template will typically involve more customization and design than working from a paid template. And, if you’ll notice, many of the templates are catered to photographers, Showit’s original primary audience. In the end, you may spend more time attempting to customize a free template than working from a paid template from a designer of your choice.
Step #3: Matching Your Showit Template to Your Brand
Step #3, or Day 3, is going to consist of matching your template to your brand. If you don’t already, you’ll need to have your brand’s color palette and typography readily available. If you don’t know your color palette or have clear typography, you’ll want to take a break from designing your website and focus on your branding first.
How are you going to match an entire website to your brand in one day? You utilize Showit’s branding tools! Showit offers an easy-to-use section labeled “Design Settings” in their backend where you can essentially plug n’ play your branding across your new site.
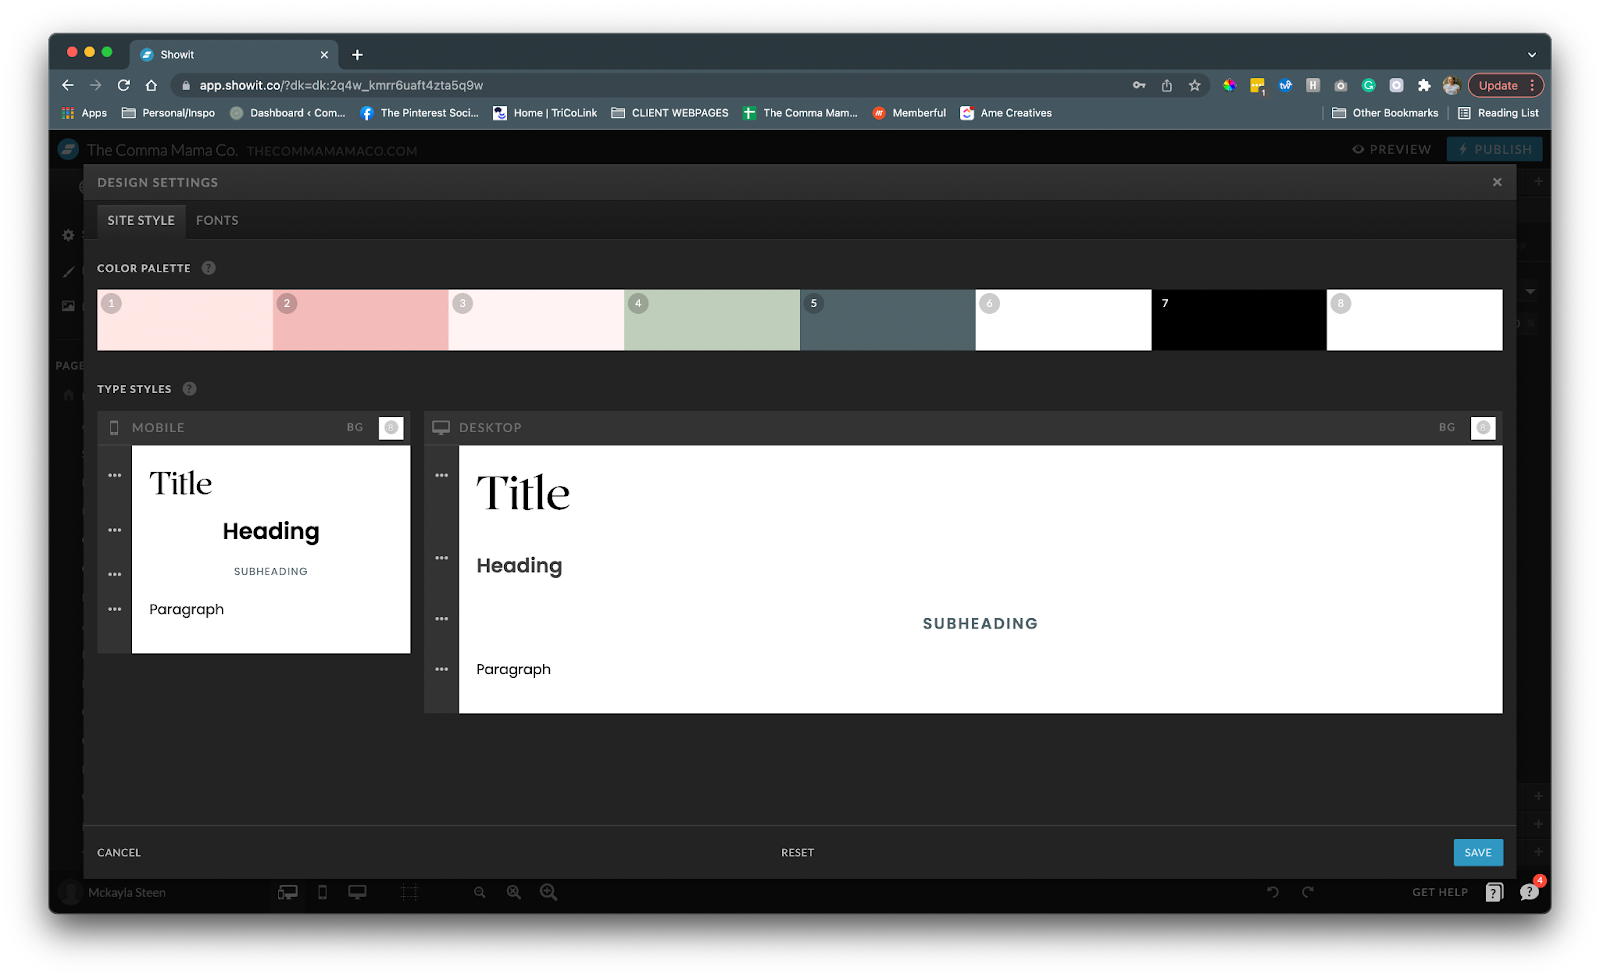
In your design settings, you can upload and swap your brand colors, brand fonts, text styles and sizes, and more. After swapping to your branding, take a look at your template and make slight adjustments where needed (such as swapping to a script font where it was originally typed).
Showit comes pre-set with Google fonts, but you’ll have to manually upload your custom font with a WOFF file. Before using, ensure that you have proper licensing for your font file. If you’re working with a custom font that you’ve uploaded, you will want to be very careful when checking your site for font errors. Depending on where your font originated, your WOFF file may not render correctly on Showit.
What If I Don’t Have Time to Customize My Template?
If you’re in a period of rapid growth and cannot find time to customize your Showit template yourself, you can reach out to us for template customization. Template customization allows you to get a little bit of personalization that you would experience in a website build, but in a shorter time frame and based on the template you choose.
Step #4: Swap Your Images
It might sound a little ridiculous that the entirety of your Day 4 is going to be used swapping your template images to match your brand images, but this is the first step that’s going to involve a little bit of SEO. Not only will you need to spend time uploading and resizing your images for your website, but you’re also going to need to add in your alt image descriptions and SEO titles.
This is one of the many SEO features that Showit offers its users and is one you should take advantage of when preparing your new website for launch. Plus, you’ll want to make sure your large photos are not taking too long to load and that all photos have been swapped out for your own photos.
Step #5: Add Your Copy
Step #5, or Day 5, is adding your copy to your website. This can be the most time-consuming part of building your website in a week, or it can be relatively simple if you have your copy prepared ahead of time.
With templates, you have designated spaces for your text that you can easily paste your copy into. While you may need to spend some time resizing your boxes based on the amount of text space available, your text properties are already set and should be personalized thanks to setting your branding on Day 3.
If you don’t have your copy prepared ahead of time and you’re typing it up as you go (not recommended, but I understand that it happens), you may be spending more time than just one day. This can push your website launch date beyond a week, but you’ll have less resizing to do thanks to writing the copy exactly as the space allows.
What if I Don’t Know What to Write for My Website Copy?
If you’re struggling with your website’s copy, look for a resource that is specific to your niche or created by a professional copywriter – unless you can work directly with a copywriter. Good copy goes a long way in attracting your ideal client and building your SEO.
If you have the time, approach your copy over the course of a few days. Focus on one page each day instead of tackling it all at once. This gives you time to brainstorm and look back at your writing and edit.
It’s also important to remember that while your copy is important, you can always go back and update it as you find yourself more comfortable in your business and offers. As you shift in your business, your marketing and therefore your copy will naturally adjust to align with your current offers.
Step #6: Perform a Final Review on Your Website
Step #6, or Day 6, is a bit tedious. You’re going to do a full review of your website. You’ve plugged in your copy, your images, and your branding, and now you’re ready for a final look over your website to make sure everything is exactly what (and where) you want. This is also when you want to connect any outside apps with your website, such as your Instagram feed or separate contact forms.
Do not skip this step. Yes, you’ll most likely find small errors after launching your website, but a final look prevents the most noticeable errors. This allows your website to look professional when users first visit.
Outside of simply looking professional, you’ll also be able to confirm that your website is fully functional. You’ll want to double-check your icons and links to ensure they’re directed to the correct place and that you have skipped any random text boxes.
Do I Need to Review the Mobile Version of My Website?
Yes! You always need to do a final review or walkthrough of not only the desktop version of your website but the mobile version as well. Showit templates are built to automatically adapt to mobile devices, but if you’ve edited text boxes, images, sizes, or fonts, there’s a possibility that the mobile version of your website needs to be edited – even if it’s only slightly.
You can do this in your Showit dashboard as you look through your pages prior to launch. I suggest using the preview option instead of relying on your “design” view.
Step #7: Launch Your Website!
Day 7 focuses solely on launching your website! More than announcing to your audience that you now have a website, this is the day you’ll hit publish and check that your website is ready to go live – and is actually going to go live. This is the final step in building your website, and if you’ve managed to take it step by step as we suggested, then this means that you’re successfully launching your website in a week!
Congratulations on taking this next step in your business and establishing your presence online! Now, you’ll be able to focus on marketing and creating a client journey that encourages your leads to explore your website, learn more about you and what you do, and claim their spot!Don’t forget to tag us @amecreatives on IG during your launch so we can help share (and show-off) your new site!


[…] We make it easy with a Showit template designed for your niche – multiple offers, client testimonials, social media accounts and all. It’s the easiest way to put your business online with a professional look – you can even have it published in a week! […]
[…] point of Showit’s websites is that they can be launched and set-up quickly, sometimes in only a day or a week when using a Showit template. Thanks to Showit’s nifty design settings, you can quickly implement […]